Car Tips & Advice
AC Compressor Replacement Cost
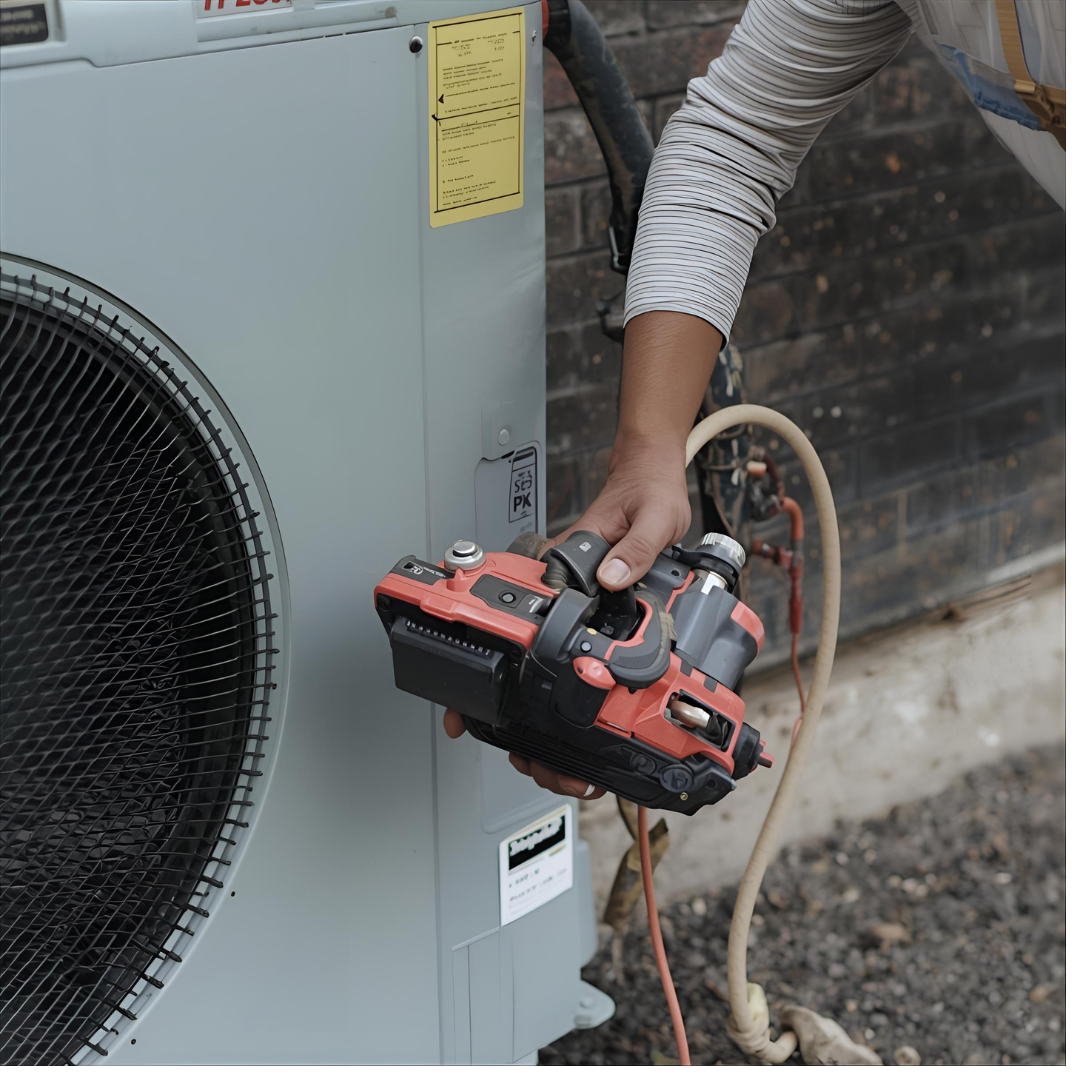
Is your car’s AC making sounds or not blowing out cold air? It could be a bad AC compressor, and you may need to replace it. I will provide the AC compressor replacement cost for cars such as Honda, Toyota, Chevy, and Ford, so you have an idea.
AC in the car gives you that luxury you desire, especially while driving for long hours or in hot weather. The truth is, a faulty AC compressor can only make one uncomfortable, so there is no risk. The challenge most drivers have is the risk of replacing it because it is costly. This is why you must take care of the air conditioner in the car.
For the AC to work well, the compressor must be in good condition. The compressor is like the heart of the AC unit. Basically, the compressor squeezes refrigerant, which goes through some coils to cool off and turn into a liquid.
Most times, when a car’s AC fails, the problem is with the compressor; sadly, the replacement cost is expensive. How much will it cost to replace an AC compressor? First, you need to understand the importance of the AC compressor and know when you have a faulty compressor.
What Is a Car AC Compressor?
Your AC system is an enclosed circuit that’s filled with a special gas known as refrigerant. It does the following:
- Squeezes the refrigerant
- Generates High Pressure
- Circulates the Flow
The condenser cools the hot gas and then turns it into a high-pressure liquid. This fluid is then sent through a filter and travels past an expansion valve that turns it into a sub-zero mist of low pressure before being sprayed into the evaporator. The refrigerant doesn’t move without a working compressor. The pressure won’t build in the same way; there won’t be any heat exchange.
Signs of a Bad AC Compressor
A technician can help you check for the fault. However, there are obvious warning signs. The signs of a bad AC compressor can also help you explain what’s wrong to your technician. They may include the following:
Warm Air from Vents
The most recognizable sign is hot or warm air from the vent. If air is blowing but not cold, the issue is likely that the compressor is not working.
Loud Noises
When the air conditioning is switched on, you may hear an audible “click.” This is the compressor’s clutch locking into place. What you don’t want to hear are grinding, or whining sounds. If there’s a grinding sound, this is very bad, probably because the internal bearings are broken.
The “Stuck” Compressor Clutch
Your compressor has a pulley that rotates all the time with the engine’s serpentine belt. The compressor itself doesn’t, but that only happens after an electromagnetic clutch is engaged. If this clutch locks up, the compressor will be running 100%, which can damage the AC unit.
The Clutch Won’t Engage
When you press the AC button, there will be no “click,” and in the middle of the pulley, it won’t turn. This may not require a complete replacement. Perhaps you have a blown fuse or a bad relay. However, it is still possible that the compressor is under pressure.
Fluid Leaks
The compressor has seals inside that keep the coolant and a special oil inside (PAG oil). If these seals break, you might notice a greasy, thin fluid that’s often greenish leaking from the compressor body or hose connections. Lack of oil will cause the compressor to fail quickly.
Blown Fuses or Tripped Breakers
A struggling compressor will pull too much power and may blow the AC fuse repeatedly or trip a circuit breaker. The problem here is that it can damage the Serpentine Belt. A huge strain on the serpentine belt from a seizing or seized compressor pulley can make it crack or even break.
Related Post:Portable Air Conditioner for Car
Average Car AC Compressor Replacement Cost
In the U.S., the average AC compressor replacement cost ranges from $500 to $1,200. But that’s just the average. Depending on your vehicle type and location, you could spend as little as $500 or as much as $2,500 for high-end vehicles.
AC Compressor Replacement for different vehicles.
Toyota Camry 2012, 2013, 2014, 2015, 2016, 2017.
RAV4 2009 2010 2011 2012.
Sienna 2013, 2.5L 2.7L L4, 8831008080 8831008081 8831008082 8831008083 158367 157367 8831042333
Specification
| Manufacturer | BDELI | |
| Brand | BDELI | |
| Voltage | 12 | |
| Pulley Groove Quantity | 6 | |
| Oil Type | PAG46 | |
| Clutch Included | Yes | |
| Oil Prefilled | Yes | |
| To fit | R-134A | |
Replacement cost is between $1040
For parts: $670
Labor cost: $500. Note: Prices may vary based on location and model.
- Vehicle Type: Toyota Corolla
Replacement Cost: The average cost for a Toyota Corolla Car AC Compressor Replacement ranges from $800 to $1200.
Parts: $650.
Labor cost: 500 USD
Replacement parts: $784 for labor. Take note: Prices may vary depending on your location.
- Type of car: Chevrolet Silverado
Replacement cost: $559 and $770 for labor.
- The 2016 Chevrolet Malibu AC Compressor replacement cost is between $1,096 and $1,358. Labor costs are between $561 and $823.
- Type of Car: Honda Civic
AC Compressor Replacement cost is between $926 and $1,521
Labor costs are estimated between $322 and $473.
- Vehicle Type: Ford Focus
AC Compressor Replacement cost for Ford Focus starts at $954.
Parts: $492.
Labor: From $400. Prices may vary depending on your location.
Take note: If you’re replacing the compressor through a dealership, expect to pay more. Independent auto shops or local mechanics charge less.
Related Post:Car Undertray Repair Cost
Factors that determine AC compressor Replacement Cost
Not every AC compressor replacement is the same. Many factors go into how much you will pay, such as:
- Your Vehicle’s Make and Model
Luxury models, such as BMWs or Mercedes-Benzes come with more complicated AC systems that are more expensive to fix. On the other hand, Toyota, Honda, or Ford use simpler compressor types, so replacement parts are less expensive.
- Type of Compressor
There are several styles of compressors: scroll, rotary, and variable displacement. The type of vehicle you have will determine the price and labor.
- Labor Cost
The cost depends on location and the type of car. Big cities may charge more than smaller towns. A compressor replacement takes about three to five hours based on the vehicle model.
- Additional Repairs
Sometimes, it’s not just the compressor that is broken; you might also need a new receiver-drier, expansion valve, or refrigerant recharge, which will add up in cost too.
- Warranty and Brand
If you’re buying an OEM compressor (original manufacturer part), it attracts more cost. Aftermarket or remanufactured compressors are cheaper but may not last long.
Repair vs. Replace: Which Is Better?
Repairing a compressor is cheaper no doubt, but it is usually a temporary solution. A compressor has many components that can wear out after a long time. If the clutch or bearings are bad, replacing the whole unit will be far more expensive. In addition, you get a warranty with a new compressor and assurance that other parts of the AC system are working correctly.
How Long Does a Car AC Compressor Last?
Ideally, car AC compressors can last up to 10 years. However, poor maintenance practices, refrigerant leakage, or moisture entering an air conditioning system can reduce the life span. If your AC starts to malfunction later than that, it is vital to call a HVAC technician to check. Spotting things early, like leaks, can save you from needing a whole new compressor later.
Can you drive with a bad AC compressor?
It doesn’t make sense to drive with a bad compressor because it can damage other good parts. The point is, why turn your AC on when it is not working? Instead of cold air, it brings out hot air. So while you may be able to postpone the repair for a little while, you shouldn’t turn on your AC when the compressor is not working.
How to get a cheaper AC compressor replacement
Get Prices From Different Places
The prices for AC compressors differ according to location. To get a quality brand at a cheaper price, you should compare the cost by visiting at least 3 different auto shops. Sometimes, taxes, and shipping costs can make the cost higher than in other cities.
Go to a Good Local Technician
To be honest with you, what your regular auto mechanic can do is what you will get from dealerships. Check the dealership cost and compare what your local AC technician is charging you. Usually it costs more. Regular mechanics can do the same job just as well, and is cheaper
- Check Aftermarket Parts
Instead of OEM parts, you may go for aftermarket parts. With aftermarket compressors, you will get something cheaper. However, check the product; ensure it is from a reputable brand. Go with your technician for a proper inspection.
Use Online Parts Stores
You can buy the compressor yourself online from RockAuto, AutoZone, or CarParts.com and then pay a technician to install it for you. Visit any of these sites, type your car, model, and location; it gives you the price ranges. For good deals, call the customer care; you may likely get a discount.
Check Warranty Coverage
Some vehicles still have coverage on their AC components under an extended warranty; check before you make the payment.
DIY vs. Professional Replacement
The process may appear simple, however, if not done correctly, it can cause serious damage. A DIY approach may not work, this is different from the portable Air conditioner for cars. Replacing an AC compressor requires proper handling, and the task requires tools and certification to perform it legally.
If those tools are not available, it is better to pay a professional than to invest in the necessary equipment. However, if you can do it yourself, follow the manufacturer’s instructions.
Note: Venting refrigerant into the atmosphere is illegal in the United States (EPA), so always recover it before working on the car.
Diagnosing Compressor or Clutch Failure
The compressor clutch sometimes will fail without the rest of the compressor failing. The compressor clutch is what connects and disconnects the compressor from the engine when you turn on your AC. If the clutch is bad, it could mean that your compressor does not spin even though it is good. Replacing just the clutch costs between $200- $500, depending on your car model.
In many modern apps, compressors come as sealed units, meaning that you cannot replace just the clutch, so this would require a full compressor replacement instead.
These numbers can vary by state, with higher rates in California, New York, and Florida compared to smaller Midwest towns.
FAQs
Should You Replace the Entire AC System
If dirt or metal fragments spread through the system when the compressor fails, technicians may then suggest that you replace other parts , like the condenser, dryer, and expansion valve. This increases the replacement cost.
Must I Flush After Replacing My AC Compressor
After a compressor replacement, it is vital to flush it. Flushing the system helps remove contaminants and old refrigerant oil. Failure to do so may cause premature failure of the new compressor. A good dealership or AC technician always flushes the system, replaces the receiver/dryer, adds PAG oil in the type and quantity specified by the manufacturer, and then recharges with refrigerant.
How to know the replacement was successful
Check these signs after installation:
- Air gets cold fast
- No weird noises from the compressor
- No leaks at fittings
Conclusion
A faulty AC compressor most of the time needs a replacement. To replace it is somewhat expensive, but to enjoy your ride as always, then you should replace it. On average, the AC replacement cost is between $500-$2500.
However, the exact amount depends on the vehicle type, model, and location. You can use a dealership or a local AC technician, but make sure that you ask for the total amount. For cheaper deals, check different shops, and also look into warranty coverage.
If everything is working perfectly, regular maintenance and fixing when you notice some bad signs will make your AC last long.
Now you know that when your A/C starts blowing warm air, the compressor may be bad. The best option is to replace it.
Hope this is helpful? For more information on how to shop for any AC parts, contact us through the social media buttons here.
Additionally, we really do appreciate constructive feedback about our articles. If you have suggestions on how we could share information better don’t fail to drop feedback in the comment section.
Krust Rust Proofing: Metal’s constant adversary is rust. The chemical reaction of iron, oxygen, and moisture is a slow-motion catastrophe that undermines structural integrity, reduces resale value, and causes expensive mechanical failures in everything from the beloved classic car in the garage to the diligent family SUV, the steel beams of a specialised structure, or even garden tools.
Many products in the metal preservation industry offer redemption. Krust (often marketed as Hammerite Kurust) is one of the most talked about. This product represents a specialised area of science called rust conversion; it is more than just a barrier.
The chemistry, application techniques, safety precautions, and long-term effectiveness of this vital maintenance procedure will all be covered in this guide. We’ll go over how Krust functions at the molecular level, how to use it expertly, and how it fits into a comprehensive metal care plan.
Gaining an Understanding of Krust Science
You must first comprehend both your enemy (rust) and your ally (Krust) in order to fully master rust proofing. Knowing why a product works as well as how to use it gives you authority.
The Chemical Process of Corrosion
Iron oxide ($Fe_2O_3$) is rust. It develops when steel or iron comes into contact with water and oxygen. The porous and flaky nature of rust is what makes it so destructive. Iron oxide flakes away, revealing a new layer of iron to the weather, in contrast to aluminium oxide, which creates a hard, protective layer over the metal beneath. Until the metal is destroyed, the cycle keeps going.
A lot of common rust-proofing techniques are barrier techniques, meaning they try to keep water and oxygen out of the metal. These consist of regular paints, wax-based sprays, and rubberised undercoatings. Their fatal flaw is that rust will continue to grow undetected, frequently until it is too late, if moisture is trapped beneath the barrier or if the barrier cracks.
Krust’s Impact on the Game: Rust Conversion
Krust is a chemical treatment, not a barrier paint. Rust conversion is its main purpose. It actively modifies the enemy’s chemical makeup.
There are two active main components in the milky fluid:
-
- One type of organic polymer is tannic acid. It undergoes a chemical reaction when it comes into contact with iron oxide (rust). The porous iron oxide is transformed by the tannic acid into ferric tannate, a stable, hard, insoluble, blue-black complex.
- Synthetic Polymer (typically Acrylic): This polymer dries concurrently with the rust being converted by the tannic acid. This covers the freshly converted surface with a hard, transparent, protective film that resembles acrylic.
Related Post:The Ultimate Guide to Rough Idle Causes: Diagnosis, Solutions, and Prevention
The New Foundation: The Converted Layer
There’s more to Krust’s blackening of the rust than meets the eye. A new surface is visible to you. This layer of ferric tannate is stable. It has lost its porosity. It offers a great base for a topcoat of paint and adheres firmly to the metal beneath.
Krust is intended to be used on surfaces that are soundly rusted. The product cannot carry out its main purpose if there is no rust because there is nothing for the tannic acid to react with. It is a particular fix for an issue that already exists.
The Complete Guide to Application
Chemistry comprehension is theory; mastery of the framework must be proven through practice. Results from a flawed application will be flawed. This section explains how to use Krust professionally, based on years of technical application and diagnostic experience.
Phase 1: Critical Pre-Installation Diagnostics and Inspection
A product is not applied carelessly by a specialist. They start by diagnosing the surface.
- Confirming Structural Integrity: The purpose of rust conversion is surface treatment. Metal that has already lost its structural value cannot be repaired by it. A mechanical test must be performed:
-
- The Tap Test: Using a tiny hammer or screwdriver, gently tap the rusted area. It ought to ring like sturdy metal. The rust is too deep if it makes a dull thud.
- The Penetration Test: Use a firm tool to try and pierce the rust. If a hole can be made, the metal is damaged and needs to be replaced or repaired with clean steel by a skilled welder. Krust is useless when applied to perforated metal; it’s like painting over a termite-infested beam.
- Surface Prep: The Basis for Achievement More rustproofing projects fail due to poor preparation than any other factor.
-
- Remove Loose Flakes: To remove any rust that is flaking, scaling, or loose, use a wire brush or scraper. A surface that is firmly bonded to the substrate but still rusted is considered sound.
- Degreasing: Krust is unable to penetrate grease and oil. To completely clean the area, use an automotive degreaser. Rinse with fresh water.
- Salt Removal: In coastal regions or locations that use road salt, the metal will be contaminated with chlorides. Chlorides will quickly accelerate new rust even below a conversion layer. Use a specific salt-neutralizing wash if necessary.
- Rinse and dry: Krust needs a clean, slightly damp surface to promote the reaction; it cannot be used on soaked surfaces. Give it a quick flash dry after wiping it dry.
Phase 2: Techniques for Professional Application
When you’re prepared to apply, you need to safeguard your project, yourself, and your product.
- Protect the Mother Bottle. This is a rule taught to every apprentice. NEVER dip your brush directly into the original Krust container.
-
- Reason: When your brush comes into contact with rust, it immediately picks up iron oxide particles. If you dip that brush back into the original bottle, those particles will trigger the reaction inside the bottle. Within a few days, your entire expensive container of Krust will have reacted and solidified into a useless blue-black sludge.
- Method: Pour the estimated amount of Krust into a different plastic container that has been sanitised. Use that container for your application and dispose of any unnecessary parts. Avoid pouring it back.
- Application tools and methods
-
- Tools: For most applications, a good paintbrush with synthetic bristles works best. Using a brush, you can “scrub” the chemical into pitted or uneven surfaces. For large, level surfaces, a small roller can be helpful.
- The Reaction: Make extensive use of Krust. In 15 to 30 minutes, the magic should start to happen. In the rusted area, reddish-brown will give way to a deep blue and finally a hard, matte black.
- Wait and Check: They did not react if an hour goes by and some areas are still brown. This frequently indicates that there was still grease or that the rust was excessively thick. After degreasing and re-preparing that particular area with a wire brush, reapply. To be successful, the surface must be entirely black.
Phase 3: Post-Reaction Curing and Topcoating
When the surface turns black, the process is not finished. Although stable, ferric tannate is not a long-lasting finish. For the most part, it is a primer.
- The Cure Time: You must allow enough time for the converted layer to fully cure. This is more than just “drying”; it takes time for the chemical complex to completely solidify.
- Generally speaking, don’t apply any topcoat for at least three hours. Extend this to 24 hours in cold or muggy weather.
- The Required Topcoat: The most important rule for Krust Rust Proofing is that Krust must be painted over.
-
- Reason: The ferric tannate layer itself can gradually deteriorate over a number of years when exposed directly to UV light, rain, and road debris, even though converted rust won’t revert to iron oxide.
- The solution is to cover the converted black foundation with a superior protective paint system. While Krust guarantees that no active rust is trapped beneath it, this offers the last, long-term barrier shield that stops fresh moisture and oxygen from attacking the underlying metal. The best options are an appropriate automotive primer and enamel system or a premium direct-to-metal (DTM) paint.
Different Metal Care Systems vs. Krust
The real authority is aware of a product’s strengths and weaknesses. There is only the appropriate tool for the task; there isn’t a single, all-purpose solvent for rust. By providing a nuanced perspective of Krust in the marketplace, we prove our reliability.
Comparing Oil-Based Penetrants (such as Rust Check and Krown)
-
- How They Operate: Rust cannot be converted by oil-based systems such as Krown. They are penetrants of capillary action. These are extremely light oils that “creep” into nooks, welds, and seams that are inaccessible with a brush. They produce a thin, self-healing oily barrier and displace moisture.
- When to Use Krust: Krust works best for heavily pitted, visible surface rust on wrought iron gates, floor pans, garden furniture, and frame rails. For a professional painted finish, it produces a fresh, stable substrate.
- When to Use Oil-Based: When treating hidden cavities, such as those found inside doors, rocker panels, frame interiors, and fender wells, oil penetrants are crucial. A skilled rust-proofing specialist will frequently employ both methods: Krust for visible rust on the chassis and an oil-penetrant spray for the internal panels.
Comparing Electronic Rust Prevention
-
- How They Operate: By applying a small electrical current to the vehicle’s body, these devices—often referred to as modules—possibly interfere with the electrochemical process that produces iron oxide. New car dealerships frequently sell them.
- Efficacy Debate: There is a lot of disagreement among experts regarding these systems’ efficacy and user experience. They provide no defence for used cars that already have rust.
- In conclusion, electronic systems have no control over an ongoing rust issue. Rust needs to be physically removed or chemically converted using a product such as Krust. A module won’t make rust that already exists go away.
Safety and the Environment,
Safety Procedure
A master is a safety expert.
- Ventilation: Organic acid vapours are released by the krust, despite its low volatility. Always apply outside or in a garage with good ventilation.
- Skin Protection: Although gannic acid is harmless, it will leave your skin black. It irritates people as well. Put on latex or nitrile rubber gloves.
- Eye Protection: When wire brushing or applying overhead, wear safety glasses to prevent splashes and drips.
Limitations of Krust:
Krust is an excellent solution, but we need to be clear about its limitations.
-
- Structural Loss Is Not Repaired: As previously mentioned, Krust will not repair perforated metal. The rust needs to be removed.
- Krust only reacts with rust, so it cannot be used on sound paint. It will simply dry into a hard, milky film that is challenging to paint over if applied to a painted surface with no rust.
- The converted black surface is a foundation, not a finish, so it needs to be protected. It will eventually deteriorate if it is not painted for several months.
The “Cure” Factor: Advanced Environmental Variables
The ability to adjust to one’s surroundings is a common indicator of rust proofing expertise. The most frequent cause of product failure is ignoring temperature and humidity, which control chemical reactions.
The Humidity Conundrum
Excessive humidity (above 85%) can be harmful, even though Krust needs a slightly damp surface to facilitate the chemical migration of tannic acid into the metal’s pits. The acrylic polymer in the solution may “blush” or trap moisture against the metal before the conversion is finished in high-humidity conditions.
- The Master’s Tip: Increase the “open time” between coats if you’re working in a humid environment. Use a heat gun on a low setting (moving continuously) to promote the polymer’s cross-linking if the product stays tacky for longer than two hours.
Temperature Limits
Iron oxide undergoes an endothermic chemical conversion. The reaction considerably slows down below 10°C.
- The Caution: The conversion may only be surface-level if Krust is applied to freezing metal. The rust beneath will continue to be active even though the surface will turn black. After application, make sure the substrate—the metal itself, not just the air—is at room temperature for at least four hours.
Recognising and Stopping “Re-Rust”
In this field, being trustworthy means admitting that no treatment is “magic.” If the system is compromised, rust may reappear even after conversion.
The issue with “Shadow Rust”
Steel with deep pits frequently has tiny rust pockets covered in a layer of compressed oxidation. The Krust might not reach the pit’s bottom if you just brush the surface.
- The Fix: Make a “stippling” motion with your brush. “Stab” the bristles into the pitted areas rather than using long, smooth strokes. Surface tension is broken by this mechanical action, which pushes the converter into the metal’s tiny valleys.
The Road Salt Chloride Danger
Road salt (sodium chloride) is the main cause of rust-through in the automotive industry. Because chlorides are “hygroscopic,” they absorb moisture from the atmosphere. The salt will eventually attract enough moisture to rupture the conversion layer from the inside out if you convert rust but leave it trapped in the metal pores.
- Expert Protocol: Use a solution of water and baking soda or a chlorides remover to clean the rusted area before applying Krust. This ensures that the tannic acid is reacting with the iron rather than opposing the salt and neutralises the acids.
Frequently Asked Questions: Krust Rust Proofing Mastery
Can “clean” or unrusted metal be treated with Krust? Yes, in theory, but it’s not advised. Tannic acid, which is present in krust, actively seeks out iron oxide (rust) to form a chemical bond. Since there is no “reactant” on clean steel, the product just dries as a thin plastic film that may eventually peel. A standard etching primer is a far more reliable option for clean metal.
How many coats of Krust should I apply? Generally speaking, one generous coat will do. In order for the chemical reaction to reach the base metal, the rust must be saturated. However, a second coat applied half an hour after the first can guarantee that no “brown spots” (unreacted rust) remain if the surface is extremely pitted.
Does Krust have an expiration date? Indeed. If the liquid inside the bottle has changed from a milky, off-white colour to a dark grey or purple, or if it has become unduly chunky, you can be certain that Krust has expired. This typically occurs because exposure to high temperatures or cross-contamination (dipping a used brush into the bottle). The bottle should always be kept dry and cool.
Can I use Krust on top of old paint? Paint that is still intact cannot be penetrated by krust. It is only effective in places where the paint has flaked or bubbled, exposing the rust underneath. Before applying paint to a partially painted surface, you must “feather” the edges of the good paint and wire-brush the rusted areas.
Is Krust safe for plastic or rubber components? While Krust is designed for metal, it is generally “plastic-safe.” However, if it drips onto rubber hoses or plastic trim, it can leave a stubborn, dark stain once it dries. It is best practice to mask off nearby rubber components or wipe away splashes immediately with a damp cloth before they cure.
Can I use a spray gun to apply Krust? Yes, but it needs to be a specific primer gun with a bigger nozzle (between 1.8 and 2.0 mm). Krust is water-based and contains polymers, so you have to use water to clean the spray equipment right away. It is almost impossible to remove if the product dries inside your spray gun’s needle.
If it rains before the Krust dries, what will happen? An uncured conversion is doomed by rain. The reaction is neutralised and the preparation process must be restarted if the product is washed away before it turns black. To guarantee a “dry window” for curing, always check the 24-hour weather forecast.
Why did the treated area become purple rather than black? A purple hue typically suggests that the rust layer was extremely thin or that the reaction is still ongoing. When it completely oxygenates and cures, it will typically darken to a matte black. It is still safe to prime and paint over if it remains purple after a day.
How long do EV batteries last?:These days, “how long will this incredibly expensive battery actually last?” is the question that every prospective electric vehicle (EV) buyer asks, rather than “how fast is it?” or “what’s the range?” The need for reliable, open information about the single most important part of a zero-emissions vehicle has increased along with the adoption of EVs.
The traction battery serves as the vehicle’s engine, fuel tank, and primary resale value indicator in addition to being a power source. Adoption was hampered for years by doubts about battery longevity, which were frequently stoked by reports of deterioration in early leaf-era cells. Today’s discussion is moving away from theoretical anxiety and towards a dependence on deep datasets from ten years of practical application.
This is not a topic for trivial specifications; it calls for a thorough comprehension of thermal management engineering, lithium-ion chemistry, and the physics underlying vehicle charging and driving.
The narrative has evolved, as our analysis demonstrates. EV batteries are no longer the throwaway parts that people once feared they would be. Conversely, data indicates that they are often outlasting the vehicle’s useful life.
EV Battery Anatomy: Why Durability Is a Complicated Issue
You must first recognise that an EV battery is not a monolithic object in order to appreciate its lifespan. The ecosystem is extremely well-engineered.
1. The Cell Is the Power Source
In reality, an EV “battery pack” is made up of thousands of separate, smaller lithium-ion (Li-ion) cells connected in series and parallel. The magic occurs in each cell when lithium ions flow between a cathode and (often When they move through an anode (usually graphite) and nickel-cobalt-manganese (NCM) or nickel-cobalt-aluminum (NCA), a current is produced. Lithium-Iron-Phosphate (LFP) chemistry, which offers better durability at a marginal cost to energy density, has also taken the lead in standard-range vehicles in 2026.
The longevity secret is that a pack is only as strong as its weakest cell.
2. The BMS: The Unsung Pioneer
Importantly, a complex computer known as the Battery Management System (BMS) keeps an eye on and regulates the condition of these cells. Consider the BMS as the conductor of the battery. It controls each cell’s voltage, temperature, and state of charge (SoC). It guarantees that no cell is fully depleted or overcharged.
Authoritative Insight: The main factor extending battery life over the past ten years has been the development of BMS logic. Due to their lack of active BMS and thermal management, early EVs (such as the 2011 Nissan Leaf) degraded too quickly. A failing BMS is just as dangerous in 2026 as a failing cell.
3. Thermal Management: Your lifeline
The operating temperature range of modern EV batteries is sensitive and usually falls between 60°F and 90°F (15°C and 32°C). They have Active Thermal Management Systems installed to keep this up. A liquid cooling/heating circuit that circulates around the cells is typically involved in these. Hot cells deteriorate exponentially, while cold cells are unable to efficiently discharge or accept a rapid charge.
The True Meaning of “Lasting”—A Definition of Battery Degradation
A key misunderstanding is that an EV battery “fails” like an engine or a fuel pump. It does not go from 100% functionality to zero overnight. It simply degrades.
Degradation’s Anatomy (The Chemical Scarring)
Degradation in a lithium-ion cell is caused by two main factors:
- Chemical Ageing: Deterioration results from merely existing. A Solid Electrolyte Interphase (SEI) layer may form on the anode as a result of the electrolyte solution’s gradual breakdown. Although a tiny SEI layer is required, too much growth can trap lithium ions and lower the cell’s capacity. Imagine it like plaque accumulating in an artery.
- Cycle Ageing: The anode physically expands and contracts each time you charge and discharge (a full cycle). Particles or cracks in the graphite may result from this mechanical stress. Moreover, excessive charging may result in lithium plating, in which ions “plate” the anode’s surface as lithium metal, rendering it permanently unusable.
Complete Failure vs. “Useful Life”
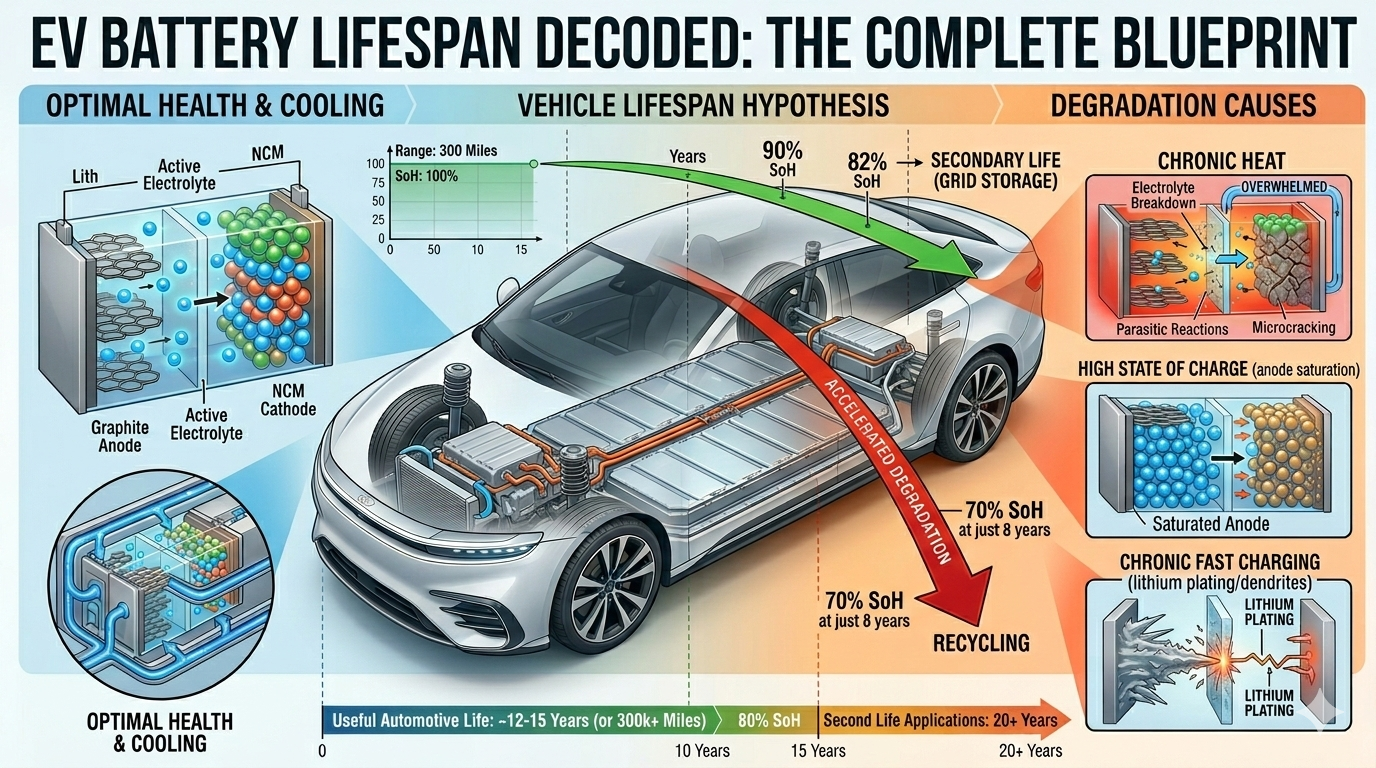
A battery’s “useful automotive life” is defined by the generally recognised industry standard as the point at which it reaches 80% State of Health (SoH).
- 100% to 80%: The battery is still operating normally, but its maximum range and overall energy storage capacity have decreased by 20%. In severe circumstances, the power output might be somewhat decreased.
- Below 80%: The vehicle is still perfectly drivable. However, if the car was originally advertised as having 300 miles of range, it now has a 240-mile maximum. Although the vehicle works, it might not be able to satisfy the original buyer’s everyday requirements. It enters its “second life” phase.
Related Post:Car Jerks When Accelerating: What I should do?
For the majority of drivers today, the real-world cutoff point for “unacceptable” degradation appears to be closer to 70%.
The Three Main Battery Killers and How to Prevent Them
Cycle ageing is significantly impacted by three controllable factors, whereas chemical ageing is unavoidable.
1. Extreme State of Charge (SoC)
There is a sweet spot for lithium-ion batteries. Between 20% and 80% state of charge is when they are most stable.
- The Danger Zone (High): When a battery is kept at 100% SoC (fully charged) for a long time, the anode and cathode are severely stressed. Additionally, it encourages parasitic reactions in the electrolyte and speeds up the growth of the SEI layer.
- The Danger Zone (Low): It is equally harmful to store a battery at 0% SoC. It may become difficult or impossible for the cell to accept a charge again if the voltage falls too low because the internal structure may collapse. Even worse is the possibility that copper from the current collector will dissolve into the electrolyte and form tiny spears called “dendrites,” which could short circuit the cell when it is charged again.
Expert Best Practice: You can set an 80% charging limit for your daily EV and only charge it to 100% right before a lengthy road trip.
2. The Silent Killer: Severe Heat
As previously mentioned, heat is a battery cell’s worst enemy. High temperatures increase the rate of chemical reactions, accelerating parasitic side reactions that degrade the electrolyte and the SEI layer. Degradation shifts from linear to exponential if the thermal management system malfunctions or is overloaded.
Experience Tip: During a summer road trip, the cooling system may be stressed by fast-charging frequently or by driving aggressively in extremely hot conditions (100°F/38°C). To save the battery in severe situations, the BMS will use “thermal throttling,” which drastically lowers your power and charging speed.
3. Prolonged Rapid Charging
While DC Fast Charging (such as Tesla Supercharging and Electrify America) is necessary for road trips, it shouldn’t be your primary method of charging. Massive current is pumped into the battery during fast charging. As it pushes lithium ions in at an amazing rate, this causes physical stress on the anode and produces a great deal of heat (because of internal resistance). Lithium plating and accelerated spalling can result from prolonged fast charging.
Actual Life Expectancy Information
We started this in-depth investigation of EV battery longevity by concentrating on the enormous datasets produced by the millions of EVs that are currently on the road, rather than on theoretical labs. The evidence is strong and overwhelming.
The 2012 Model S, the original Tesla fleet
We now have trustworthy data from nearly 15-year-old early Tesla Model S and Model X vehicles. Many of these original packs have more than 200,000 miles (320,000 kilometres) on them. The great majority exhibit remarkably shallow degradation, although some early packs needed to be replaced because of component failures rather than cell degradation. Degradation rates of only 1% to 1.5% annually are frequently reported in reports (e.g., a SoH of 85% after 10 years).
The Development of Car Packs
Importantly, modern car batteries are far better than those from 2012. We have seen a revolution in thermal design and chemistry.
- Improved Thermal Management: Current systems are vastly more efficient at dumping heat during fast charging. They use predictive logic, using your navigation data to precondition the battery (heating or cooling it) before you reach a fast charger.
- The Rise of LFP: LFP (Lithium-Iron-Phosphate) chemistry has exploded in standard-range cars. These batteries are naturally more stable, offer higher safety, and are significantly cheaper to produce. In order to calibrate the BMS, they must be regularly charged to 100%, which they tolerate. With little degradation, an LFP pack can complete thousands of full cycles.
- Cell-to-Pack (CTP) Engineering: Cells are now directly integrated into the vehicle chassis (CTC) or battery pack (CTP) thanks to advanced manufacturing. This makes packs stronger by removing intermediate modules, lowering weight, and enhancing structural integrity overall.
Forecasting the Second Life: What Becomes “Useful” Batteries?
The “automotive life” of a battery expires at about 80% State of Health. But that doesn’t mean it’s no longer useful. The market for second-life batteries is a strong, quickly expanding sector. Even a 4,000 lb (1,800 kg) vehicle’s degraded battery is a treasure trove of stored energy.
Grid Storage in a Second Life
Stationary grid storage is the most popular second-life use for deteriorated EV packs. A powerful tool for grid stabilisation is a battery pack that retains 80% (or even 70%) of its initial 100 kWh. These containers are employed for the following purposes:
- Arbitrage is the practice of storing energy during periods of high renewable production, such as midday sun and overnight wind, and releasing it during periods of high demand, such as early evening.
- Providing immediate backup power in the event of a grid outage.
- Solar smoothing is a technique used to even out the unpredictable output of large wind or solar farms.
Recycling in Closed Loops
When a battery reaches the end of its useful life (e.g., 50% SoH), it eventually enters an advanced recycling system. Recycling is not an afterthought in 2026; it is a crucial part of the supply chain for vital minerals. Companies such as Redwood Materials can recover more than 95% of the valuable elements—copper, nickel, cobalt, and lithium—from an aged cell. This material is then used to create new, high-performance cathodes, completing a circular economy.
Comprehensive Questions and Answers (FAQs)
1. Is it possible to replace an EV battery that has deteriorated?
It is physically feasible to swap out the battery pack in any electric vehicle. The AUTHORITATIVE response, however, is that it is frequently not financially feasible. It can cost between $10,000 and $20,000 to replace a 100 kWh battery pack. This expense might be higher than the car’s residual value in the case of an older vehicle with significant wear and tear, resulting in a “total loss” (much like having to replace the engine in a car with 150,000 miles).
2. What is the average EV battery warranty?
In the majority of major markets, EV batteries come with a strong standard warranty. Usually, it takes eight years or 100,000 miles (160,000 kilometres). Importantly, the majority of warranties in 2026 have a degradation threshold. During that warranty period, the manufacturer is required to replace the pack or a particular module if the State of Health (SoH) falls below 70% (sometimes 80%). California has mandated a 10-year/150,000-mile warranty on numerous models through CARB regulations.
3. Is battery longevity impacted by cold weather?
The short-term performance and range of an EV are significantly impacted by cold weather. Lithium ion mobility is restricted by cold temperatures. Lowering power output and the cell’s capacity to retain a charge by 20–30%. However, as long as the battery is not kept at an extreme State of Charge (SoC), cold weather does not seriously deteriorate or permanently harm it.
4. What is the future of Solid-State (SSB) technology?
The next significant advancement in battery technology is solid-state batteries. An SSB uses a solid ceramic separator in place of the liquid or gel electrolyte. It’s revolutionary. SSBs guarantee:
- Greater Vitality Density: Two times the range in the same area.
- Better Safety: The solid electrolyte doesn’t catch fire.
- Massively Faster Charging: SSBs don’t have the heat management problems that liquid cells do, so they can handle enormous current.
- Extreme Longevity: According to lab data, SSBs have the capacity to withstand thousands of fast, complete cycles with little to no lithium plating or spalling.
In high-end, low-volume cars, solid-state batteries are starting their early pilot programme. We anticipate that in 2028–2030, SSBs will be widely used in standard automobiles.
The Total Lifespan Hypothesis Conclusion
Thus, to respond to the query that guided the creation of this guide: What is the lifespan of EV batteries?
A modern EV battery, backed by an effective BMS and an active liquid cooling system, is not a disposable part, according to the authoritative, trustworthy response in 2026. It is a structure that will continue to last longer than the vehicle’s internal electronics, suspension, and brakes.
12 to 15 years of useful automotive life is a conservative, verified estimate for a typical Lithium-ion pack sold in 2026. In a perfect world, this can easily reach 300,000 to 500,000 miles (480,000 to 800,000 km) or 20 years before SoH falls below 80%. On a cycle-count basis, an LFP battery may have a much longer lifespan.
The days of disposable EV batteries are over, though individual component failures are still a possibility. The buyer of a 2026 EV is investing in the vehicle’s engine rather than a short-term power source.
How to dispose of used motor oil
Making sure the old oil doesn’t leak into the environment is more important than tightening the new filter after a do-it-yourself oil change. Motor oil just becomes soiled; it doesn’t “wear out” But if handled improperly, that “dirt” contains a concoction of lead, arsenic, cadmium, and benzene that can destroy nearby ecosystems.
This thorough guide guarantees that you adhere to the strictest safety and sustainability regulations by covering everything from the environmental science of spent oil to the practical procedures of legal disposal.
Why It Is Not Negotiable to Properly Dispose Oil
Prior to discussing the “how,” we need to address the “why.” Motor oil residue is a persistent pest. It is extremely effective at dispersing its toxicity and does not biodegrade as rapidly as organic waste.
The Impact of the Numbers on the Environment
- Water Contamination: One million gallons of fresh water can become contaminated by one gallon of spent motor oil. That would cover 50 people’s drinking water needs for a year.
- Devastation of the Water: Oil deposits a thin layer on the surface of rivers and ponds, obstructing sunlight and oxygen. Fish are suffocated, aquatic plants are killed, and the insulating qualities of mammal fur and bird feathers are destroyed.
- Oil binds to soil particles when it is discarded on the ground, killing vital microorganisms and causing it to seep into groundwater tables.
The Law’s Actual Situation
Dumping motor oil into the garbage, down a storm drain, or onto the ground is illegal in the majority of nations, including the US, UK, and Canada. Because inappropriate disposal results in long-term responsibility for taxpayers and property owners, the EPA (USA), the Environment Agency (UK), and provincial ministries (Canada) support these legislation.
Detailed Instructions for Getting Rid of Used Motor Oil
To properly dispose of oil, you need a method that keeps spills at bay and maintains the oil’s recyclable nature.
1. Getting Ready and Gathering
- As soon as you remove the drain plug, the disposal procedure begins.
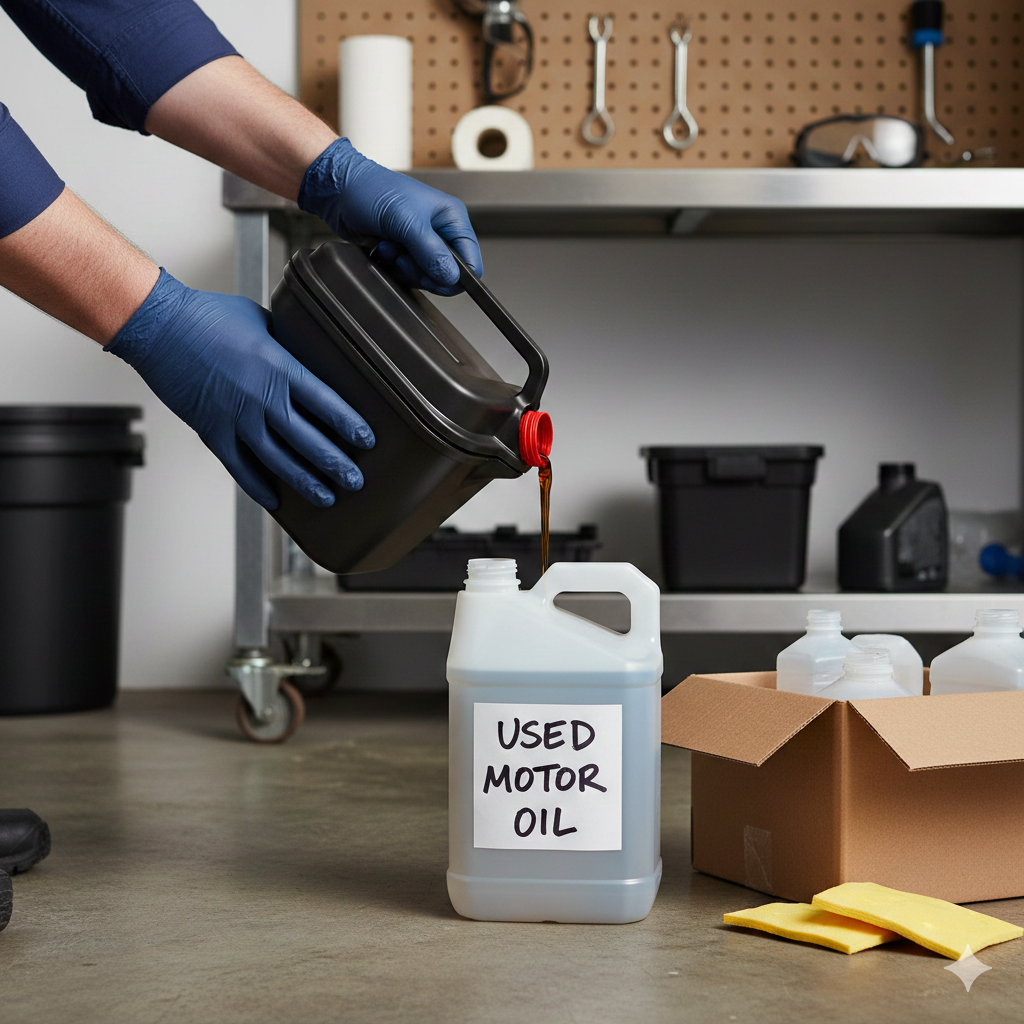
- Make Use of a Special Drain Pan: You should get a “closed-top” drain pan. You can catch the oil and carry it in the same container thanks to these containers’ funnel-style top and tight screw lid.
- The golden rule of oil recycling is to keep it pure. Used motor oil should never be used with other fluids. Most recycling facilities will not accept oil that has been mixed with petrol, paint thinner, antifreeze or even water. Because contaminated oil is categorised as “hazardous waste” as opposed to “recyclable oil,” processing it is considerably more difficult and costly.
2. Sealing and Transferring
- You have to move the oil to a transport container if you used an open drain pan.
- Acceptable Containers: Make use of containers made of high-density polyethylene (HDPE). Used motor oil bottles work well. Steer clear of clean milk bottles if you can because they are frequently overly thin and can leak or deteriorate over time.
- Only fill containers to roughly 90% of their capacity, according to the 90% Rule. This stops spillage during transportation and permits thermal expansion.
- Labelling: Make sure the container is clearly marked “USED MOTOR OIL.” This guarantees that no one will mistakenly treat it as a non-hazardous material in the event of a leak or if you forget what’s inside.
3. Remember the oil filter.
- Up to a pint of used oil is frequently trapped in the center of the oil filter. In many areas, it is prohibited to dispose of a “wet” filter in the trash.
- The “Hot Drain” Method: Make a hole in the dome (the rounded end) and the anti-drain back valve with a screwdriver or punch while the filter is still warm.
- Drain Time: Let the filter sit upside down over your drain pan for at least 12 to 24 hours.
- Recycle the Steel: The filter can frequently be recycled as scrap metal at the same facility that takes your oil after it has been completely drained.
Places to Drop Off Used Motor Oil
You must locate a certified collection place after your oil is sealed and your filter is empty.
Local Auto Parts Shops
Up to five gallons of old motor oil per person, per day, are normally accepted for free by large retailers like AutoZone, Advance Auto Parts, and O’Reilly Auto Parts in the US. For do-it-yourselfers, they have big “igloo” tanks at the back.
Quick Lubes and Service Centers
Used oil is accepted at many Jiffy Lube or Valvoline stores. However, it is usually advisable to contact ahead because they have a limited amount of tank space. A minor “environmental fee” might be assessed by some if you didn’t buy the oil from them.
Centers for Municipal Recycling
There is probably a Household Hazardous Waste (HHW) facility in your county or city. If you have a lot of oil or have inadvertently mixed your oil with another fluid, these are your best bets.
Pro Tip: To discover the closest verified drop-off place, put your zip code into websites like Earth911 or RecycleOil.org.
What Happens to Your Oil During the Recycling Process?
- Motor oil recycling is a modern chemical accomplishment. One of three routes is taken by your oil when you drop it off:
- Re-refining is the most environmentally friendly choice. To get rid of impurities and additives, the oil is dehydrated and distilled. After treatment, it is once more utilised as “base stock” to create new motor oil.
- Reprocessing (Fuel): After the oil has been filtered to eliminate heavy metals, it is used as a high-energy fuel source in power plants or industrial furnaces.
- Industrial Lubricants: Low-quality recycled oil is frequently utilised as a lubricant for large machinery or in the manufacturing of asphalt.
Safety Equipment and Cleaning
Personal protection is necessary when handling spent oil. Carcinogens found in motor oil can enter the body through the skin.
- Gloves: Always put on latex or nitrile gloves.
- Eye Protection: A single splash of hot oil in the eye can cause permanent damage.
- Spill Kits: Keep a bag of unscented cat litter or “oil dry” close at hand. If there is a spill on your driveway, cover it right away with the absorbent material, leave it for half an hour, and then sweep it up to dispose of it at an HHW facility.
The Chemistry of Pollution: The Distinctive Character of Used Oil
We must examine what happens to oil inside your internal combustion engine in order to fully understand the importance of appropriate disposal. When oil is brand-new, it is a finely developed lubricant that lowers heat and friction. However, it goes through a process known as thermal breakdown and oxidation when it passes through your engine at high pressures and temperatures.
During this process, the oil picks up a variety of hazardous materials:
Heavy Metals: Tiny particles of lead, zinc, arsenic, and chromium are released as engine parts rub against one another.
One consequence of incomplete combustion is the production of polycyclic aromatic hydrocarbons, or PAHs. Numerous PAHs are known to cause cancer.
Fuel Dilution: Oil can become more volatile by thinning and decreasing its flashpoint when unburned petrol or diesel seeps past piston rings.
Acids: When sulphur and moisture are produced during combustion, they combine to make corrosive acids, which the oil must “hold” in suspension to safeguard your metal components.
Dumping this mixture releases a concentrated chemical soup that nature cannot handle, so it’s not simply oil that’s being dumped.
Dispelling Frequently Held Myths About Disposal
Many “backyard” techniques for repurposing spent oil have been proposed over time. It is critical to comprehend why these are frequently unlawful in addition to being environmentally careless.
Myth 1: Applying Oil to Reduce Dust
To keep dust down, people used to spray used oil on dirt driveways. This is among the quickest ways to contaminate an aquifer in the area. The oil is carried straight into the groundwater by rainwater after being washed off the surface. While used motor oil is a permanent pollutant, modern dust suppressants are biodegradable.
Myth 2: Sealing wood or painting fences
Because oil contains heavy hydrocarbons, some do-it-yourselfers think it’s an excellent way to preserve wood. The oil may temporarily repel water, but it never really “dries.” More significantly, it continues to be a significant fire hazard and will leak out during every downpour. Moreover, skin, pets, or clothing may come into contact with the harmful metals present in the oil.
Myth 3: Putting the Oil in the Ground
The strategy of “out of sight, out of mind” is disastrous. Under the pressure of the soil, plastic containers eventually break down or decompose, creating a concentrated plume of toxic waste that, if found during an inspection or land sale, can reduce the value of your property and result in significant fines from the EPA.
Knowing the Re-Refining Process: Turning Waste into Profit
A common misconception is that “recycled oil” is a subpar substance exclusively utilised in industrial burners. This is a serious misunderstanding. The American Petroleum Institute’s (API) strict requirements for “virgin” motor oil must also be met by re-refined motor oil.
The Process of Re-Refining:
- Dehydration: To get rid of any water or antifreeze that might have gotten into the mixture, the spent oil is heated.
- Fractional Distillation: The used oil is boiled at different temperatures, much like crude oil. This distinguishes the heavier lubricant base from the lighter fuels, such as petrol or diesel.
- Hydro-finishing: To eliminate leftover chemicals and stabilise the molecular structure, hydrogen is applied to the oil.
- Additive Blending: Manufacturers incorporate new detergents, anti-wear agents, and viscosity index improvers after the “base stock” is pure.
As a result, the final product is identical to oil produced from recently pumped petroleum. Compared to processing virgin crude, using re-refined oil uses a lot less energy and lessens our reliance on foreign oil.
Expert Advice for Handling Vast Amounts of Fluids
A 5-quart container is insufficient if you maintain several vehicles. This is how high-volume disposal should be handled:
- Purchase a 5-Gallon.”Boy” Jug: These are sturdy, transport-oriented stackable containers. They are less likely to topple over in the back of a truck and are far more durable than household plastic.
- Participate in Community Collection Days: Mobile collection stations are put up during “Hazardous Waste Saturdays” in many counties. This is frequently the simplest method for getting rid of brake fluid, gearbox fluid, filters and oil in one trip.
- Check with Local Marinas: Many marinas offer extensive boater oil recycling services if you live close to the water. If you ask nicely, they frequently allow locals to use their tanks.
Related Post: How to Check Engine Oil Like a Pro
How to Respond to a Significant Spill
Accidents happen despite the best preparation. Take these actions right away if a drain pan in your driveway or garage tips over:
- Contain: To prevent oil from getting to a floor drain or the pavement’s edge, use a physical barrier such as “oil snakes” or even a pile of dirt.
- Apply a generous amount of an absorbent substance. Although cat litter is the most widely used household item, absorbents based on peat moss or professional diatomaceous earth operate considerably more quickly.
- Scrub: Use a concentrated degreaser and a stiff brush to remove any remaining oil from the concrete’s pores after sweeping up the saturated absorbent.
- The oil-soaked absorbent should not be disposed of in the trash. Since it is now a flammable solid, it needs to be bagged and transported to a hazardous waste site.
Beyond the Conventional Oil Change: Advanced Disposal Scenarios
While most DIYers deal with standard automotive engine oil, there are several “edge cases” in fluid disposal that require a more nuanced approach. Understanding these ensures you stay compliant with environmental laws while maintaining the highest level of workshop safety.
Handling “Milky” or Tainted Oil
If your oil drains and turns into a “chocolate milkshake,” you have a major mechanical issue. Usually, this is caused by a blown head gasket that lets coolant mix with the oil.
- The issue is that this mixture is now an emulsion of oil and glycol (antifreeze), rather than just “used oil.”
- The Disposal Solution: The majority of retail auto parts stores screen for water and antifreeze using sensors or visual inspections. They will reject your oil if they find it. This particular mixture needs to be taken to a Household Hazardous Waste (HHW) facility. Put “Oil/Coolant Mixture” on the container so the technicians can run it through a separator.
Two-Stroke Oil and a Small Engine
Many homeowners are curious as to whether the oil from their old two-stroke outboard motor, chainsaw, or lawnmower is different.
- Four-Stroke Small Engines: Regular motor oil is used in generators and lawnmowers. You can recycle this by mixing it directly with the used oil from your car.
- Two-Stroke Pre-mix: Do not put old ‘pre-mix’ (gasoline combined with 2-cycle oil) in your oil recycling container if it has gone stale. It is extremely flammable and produces a vapour hazard because it contains petrol. This ought to be disposed of at a hazardous waste site as “waste fuel”.
World Views on Oil Management
Regional differences in infrastructure and environmental priorities are reflected in how we handle oil.
According to EPA guidelines, the United States
In the United States, used oil is managed by the Environmental Protection Agency (EPA) in accordance with the “Used Oil Management Standards.” By making recycling less difficult than getting rid of hazardous waste, the intention is to promote recycling. Oil is classified as “Used Oil,” which has less storage restrictions than “Hazardous Waste,” provided that it is not combined with hazardous chemicals.
Europe and the United Kingdom
The Waste Care regulations are followed in the UK. Oil disposal in household bins is strictly prohibited. For engine oil, the majority of “Local Authority Recycling Centres” have special tanks. The “polluter pays” principle is strongly enforced in Germany and other EU countries; when you purchase new oil, the retailer is frequently compelled by law to return an equivalent quantity of used oil at no cost.
Why Used Oil Is Valuable from an Economic Perspective
Why businesses like AutoZone are so eager to take your used oil for free may be a mystery to you. Petroleum’s commodity value holds the key to the solution.
Motor oil that has been used is a “feedstock.” Because it is less expensive to re-refine used oil than it is to explore, drill, and refine new crude, used oil gains value when oil prices rise.
- Energy Density: The BTU (British Thermal Unit) rating of used motor oil is extremely high. Because of this, it is a very effective fuel for industrial heaters.
- Job Creation: Thousands of technicians and chemists are employed by the re-refining industry, which also contributes millions to the “green economy.”
Not only are you being a “good person” by recycling your oil, but you are also contributing to a circular economy that lessens the automotive industry’s energy footprint and trade deficit.
Putting Together a Sustainable Home Workshop
Installing a “fluid station” in your garage will facilitate disposal and avoid messes if you intend to perform your own maintenance on a long-term basis.
Crucial Tools for the Environmentally Aware Mechanic:
- Put your oil jugs on a spill pallet or inside a plastic “tote” for secondary containment. The tote collects the mess before it reaches your garage floor if a jug leaks during the night.
- Funnel Set: Make use of specific funnels for various liquids. Put “OIL ONLY” and “COOLANT ONLY” on one.A recycling batch can be ruined by even a small amount of cross-contamination.
- Log Book: Store in your garage a little notebook. Keep a record of when you took it to the recycler and when you changed the oil. If you ever sell your car or if there are concerns about property contamination, this is great documentation to keep.
An overview of the prohibited actions
In summary, the “Hard Nos” of motor oil disposal are as follows:
- It will damage your septic system or overburden municipal water treatment, so DO NOT pour it into the toilet or washbasin.
- DO NOT pour it into storm drains, which go straight to nearby rivers and streams.
- DO NOT combine it with “solvents” like paint thinner, brake cleaner, or carb cleaner.
- It releases heavy metals into the air, so don’t use it to “burn” brush piles.
FAQs, or frequently asked questions,
Is it okay to dispose of used motor oil in the regular trash?
Don’t. It’s against the law and bad for the environment. The pressure of a trash compactor will rupture the container, even if it is sealed in a bottle, causing significant contamination at the landfill.
Does the disposal of synthetic motor oil differ from that of regular oil?
No, recycling facilities handle conventional, semi-synthetic, and synthetic oils in the same manner and allow them to be combined in a single collection container.
Can I preserve wood or eliminate weeds with used motor oil?
Not at all. This widespread “old-school” technique is now recognised to be extremely harmful. For decades, the heavy metals in the oil will remain in your soil and may eventually find their way into your garden or nearby water source.
For what length of time can I keep used oil before throwing it away?
It can be stored indefinitely as long as it is kept out of direct heat and in a labelled, leak-proof container. To reduce the chance of unintentional spills or plastic container deterioration, it is advisable to dispose of it within a few weeks.
What would happen if I unintentionally combined petrol and oil?
Never take it to a store that sells auto parts. Their entire recycling tank will become contaminated by mixed fluids, which pose a fire risk. “Contaminated” oil needs to be taken to a specific municipal hazardous waste facility.
-
Maintenance & Repairs5 months ago
Car Undertray Repair Cost
-
Car Tips & Advice4 months ago
Is Automobile Insurance Tax Deductible?
-
Car Tips & Advice5 months ago
Tyre puncture Repair Cost
-

 Maintenance & Repairs4 months ago
Portable Air Conditioner for Car
-

 Car Tips & Advice4 months ago
Exhaust Pipe Repair Kit
-

 Maintenance & Repairs4 months ago
How much does it Cost to Paint a Car?
-

 Maintenance & Repairs4 months ago
How to repair a scratched car wheel
-

 Car Tips & Advice3 months ago
Car Steering Wheel Cover